Steve Thomas - IT Consultant

A little over a year after its initial release, a digital note-taking app called Journal is making the leap from being an experimental project housed with Microsoft’s internal incubator, Microsoft Garage, to becoming a full-fledged Microsoft Windows application. The company this week announced the new note-taking app will now be available as “Microsoft Journal,” allowing users to capture their thoughts and create drawings using their digital pen on Windows tablets, 2-in-1s and other pen-capable devices.

The original idea behind Journal was to offer users an alternative to grabbing a pen and paper when inspiration strikes, while still allowing them to express themselves through writing. The concept was familiar to the company, which had first launched an ink-focused application called Journal back on its Tablet PC in 2002 and continued to release “ink” capabilities across apps like Whiteboard, OneNote, PowerPoint and more, the company explained at the time.

Journal, however, wanted to push the concept forward by combining the digital ink input with AI technologies.

The team trained the app’s AI to automatically recognize and categorize the things users write, including headings, starred items, keywords and even drawings. For some of the drawings and headings, the app puts a cue on the side of the page that users can tap to select the content and then take other actions like “move” or “copy.”

The AI also helped to improve the app’s search capabilities so you could pull up your old notes, lists, sketches and more, based on its understanding of your inked notes and content. And the AI helped to power new gestures, like scratch out and instant lasso — tools you could move between more easily, without mode switches.

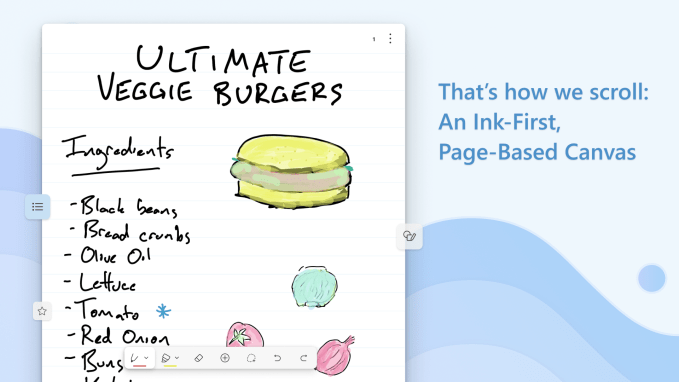
Image Credits: Microsoft

Beyond its AI focus, Journal included drag-and-drop support for moving content to other pages or different applications; the ability to markup PDFs; keyword search with filters; Microsoft 365 integration for meeting notes; using touch to scroll through pages or tap ink to select text; and more.

“We are entering an age of computer-aided reasoning, where AI accelerates the tasks that people do, and makes us all more productive,” said Stevie Bathiche, technical fellow and leader of Microsoft’s Applied Sciences, speaking about the app’s exit from Garage. “Journal shows just how powerful an experience can be when software anticipates your intentions. This is just the beginning.”

During its time as a Garage project, the team learned that users have their own individual preferences for how they interact with content using touch and a digital pen, but there wasn’t a clear winner as to the most preferred method. They also found that annotating documents was one of Journal’s biggest use cases, with PDF imports accounting for over half the pages created in the app.

With the app’s official launch, Journal has been updated with a Windows 11 look and feel, with new colors and materials. The team says its focus in the near term is to now address user feedback and a backlog of new features. The app is rolling out to users from April 5 through April 8 but can be downloaded directly from the Microsoft Store. It works on both Windows 10 and 11 devices.

When it comes to accessing devices, entering a password is a hassle, not to mention fast becoming obsolete in terms of providing strong security. Thankfully, Windows 10 and 11 users can use Windows Hello, a feature that provides a convenient and secure way to log in with just a look, a touch, or a PIN code.

How to set up Windows Hello

To get started with Windows Hello, click the Start menu icon and open Settings. From there, choose Accounts, followed by Sign-in options. You should see options for setting your PIN or scanning your face, iris, or fingerprint. Select which method you want to set up and follow the prompts to create a login profile.

You can even save your biometric data or scan more than once to boost accuracy. The system collects more data every time you scan, so it’s better to complete a few scans before enabling the login feature.

After setting up your account, you can start adding other trusted users who share the same device. Each of them can set up their own PIN or biometric profile in a separate account. Passwords and PIN codes can be used as backup login options in case the camera or fingerprint scanner aren’t working.

Limited availability

As of this writing, Windows Hello is only available on select Windows 10 and 11 laptops and tablets. To see which devices have Windows Hello, go to the Windows website, scroll down to the “Filter by” section, then select the Windows Hello option under the “Features” column. The resulting selection lists devices that have the infrared camera and/or fingerprint scanner required to enable this feature.

Microsoft’s promise of security

Your Windows Hello login info is saved only on your device and never on Microsoft’s servers. Furthermore, Microsoft assures users that third parties cannot access locally saved PIN codes and biometric data. All of this means that you never need to worry about your login info falling into the wrong hands.

In addition to Windows Hello, there are other Windows features that can make your life easier. Our IT experts can help you get more out of your Windows devices. Contact us today!

Biometric access used to be the stuff of sci-fi movies, but Microsoft has turned it into everyday reality for Windows 10 and 11 users. Thanks to a feature called Windows Hello, users can now log into their devices via face, fingerprint, or iris scan, or PIN code entry. Here’s what you need to know to set this feature up.

How to set up Windows Hello

To get started with Windows Hello, click the Start menu icon and open Settings. From there, choose Accounts, followed by Sign-in options. You should see options for setting your PIN or scanning your face, iris, or fingerprint. Select which method you want to set up and follow the prompts to create a login profile.

You can even save your biometric data or scan more than once to boost accuracy. The system collects more data every time you scan, so it’s better to complete a few scans before enabling the login feature.

After setting up your account, you can start adding other trusted users who share the same device. Each of them can set up their own PIN or biometric profile in a separate account. Passwords and PIN codes can be used as backup login options in case the camera or fingerprint scanner aren’t working.

Limited availability

As of this writing, Windows Hello is only available on select Windows 10 and 11 laptops and tablets. To see which devices have Windows Hello, go to the Windows website, scroll down to the “Filter by” section, then select the Windows Hello option under the “Features” column. The resulting selection lists devices that have the infrared camera and/or fingerprint scanner required to enable this feature.

Microsoft’s promise of security

Your Windows Hello login info is saved only on your device and never on Microsoft’s servers. Furthermore, Microsoft assures users that third parties cannot access locally saved PIN codes and biometric data. All of this means that you never need to worry about your login info falling into the wrong hands.

In addition to Windows Hello, there are other Windows features that can make your life easier. Our IT experts can help you get more out of your Windows devices. Contact us today!

You can now log in faster and more securely to your Windows 10- or 11-powered device with Microsoft’s Windows Hello. This feature allows you to log in to your computer without having to enter a password. All you need is a fingerprint, iris, or facial scan, or a PIN code.

How to set up Windows Hello

To get started with Windows Hello, click the Start menu icon and open Settings. From there, choose Accounts, followed by Sign-in options. You should see options for setting your PIN or scanning your face, iris, or fingerprint. Select which method you want to set up and follow the prompts to create a login profile.

You can even save your biometric data or scan more than once to boost accuracy. The system collects more data every time you scan, so it’s better to complete a few scans before enabling the login feature.

After setting up your account, you can start adding other trusted users who share the same device. Each of them can set up their own PIN or biometric profile in a separate account. Passwords and PIN codes can be used as backup login options in case the camera or fingerprint scanner aren’t working.

Limited availability

As of this writing, Windows Hello is only available on select Windows 10 and 11 laptops and tablets. To see which devices have Windows Hello, go to the Windows website, scroll down to the “Filter by” section, then select the Windows Hello option under the “Features” column. The resulting selection lists devices that have the infrared camera and/or fingerprint scanner required to enable this feature.

Microsoft’s promise of security

Your Windows Hello login info is saved only on your device and never on Microsoft’s servers. Furthermore, Microsoft assures users that third parties cannot access locally saved PIN codes and biometric data. All of this means that you never need to worry about your login info falling into the wrong hands.

In addition to Windows Hello, there are other Windows features that can make your life easier. Our IT experts can help you get more out of your Windows devices. Contact us today!

Filling your desktop with shortcuts to files and applications may seem practical because it lets you quickly access the resources you need. But when more than half of your screen is filled with icons, you’ll waste time looking for the files and programs you need. Ultimately, this will lower your productivity. You can avoid that by making your desktop clutter-free. Here’s how.

Do a bit of recon

Before decluttering your desktop, sort out which files and folders you need to keep and which ones you can let go of. For instance, you can OR you may want to delete files and folders that haven’t been opened in a long time. You can easily find these by right-clicking on an empty area of your desktop, selecting View, and then clicking Auto arrange icons. This will organize your icons into a grid format that makes them easier to view. Then, right-click once again on the empty space on your desktop and go to Sort by > Date modified. This will arrange the icons by the date they were last opened, with the latest on top.

Create holding and app shortcut folders

People often use their desktop folder to store downloads, photos, screenshots, email attachments, and other files, which easily messes up the desktop screen. To prevent these files from cluttering up your desktop, you should create a folder for nonessential files and folders. To create a folder on your desktop, simply right-click on an empty space on your desktop and then click New > Folder.

Use this folder to store temporary items, including those you’re keeping in the short term. Then, delete the files inside the folder once you no longer need them. You can also create a folder for shortcuts to frequently used programs. This will allow you to quickly find the program you need and help you avoid cluttering up your desktop.

Be ruthless in decluttering

Once you have your folders set up, it’s time to get rid of the clutter. If you haven’t used a file or folder in the past two months or so, seriously consider getting rid of it. Uninstall programs you no longer use, delete images you no longer want or need, move unimportant files elsewhere, and place the rest in relevant folders.

Once you’re done, take a look at your browser to see where it stores downloaded files. If your browser downloads files to your desktop by default, go to Settings and change the target location to the Downloads folder.

Stick with your plan

Once you have decluttered your desktop, try to stick with the rules you’ve made. Whenever you download something, ask yourself whether it should go to the desktop or someplace else. Of course, sticking with these rules won’t always be easy, so aim to clean up your desktop at least once or twice a month.

Use the taskbar or Start menu for apps

Pinning apps to the Start menu and the taskbar is a great alternative to simply having program shortcuts on your desktop. To pin apps, go to the apps list via the Windows Start menu and right-click on the app you want to pin. Then, simply select Pin to Start or Pin to taskbar.

Strategically position your wallpaper

An interesting way to minimize clutter is to pick a wallpaper that you like, which could be your favorite picture or slogan. Frame the image so the focus is in the center of your desktop. Then, place your icons around the image in a way that allows you to still see the image. If you can no longer see the image, that means you have too many icons and it’s time to get rid of a few.

If you want to learn other ways to optimize your Windows PC, contact us today for more tips and tricks from office IT experts.

A cluttered computer desktop can hamper productivity. When various files, folders, and applications are fighting for space on your desktop, it can be difficult to look for the ones you actually need. This affects the way you work and slows you down. Follow these tips to get rid of the mess on your desktop.

Do a bit of recon

Before decluttering your desktop, sort out which files and folders you need to keep and which ones you can let go of. For instance, you can OR you may want to delete files and folders that haven’t been opened in a long time. You can easily find these by right-clicking on an empty area of your desktop, selecting View, and then clicking Auto arrange icons. This will organize your icons into a grid format that makes them easier to view. Then, right-click once again on the empty space on your desktop and go to Sort by > Date modified. This will arrange the icons by the date they were last opened, with the latest on top.

Create holding and app shortcut folders

People often use their desktop folder to store downloads, photos, screenshots, email attachments, and other files, which easily messes up the desktop screen. To prevent these files from cluttering up your desktop, you should create a folder for nonessential files and folders. To create a folder on your desktop, simply right-click on an empty space on your desktop and then click New > Folder.

Use this folder to store temporary items, including those you’re keeping in the short term. Then, delete the files inside the folder once you no longer need them. You can also create a folder for shortcuts to frequently used programs. This will allow you to quickly find the program you need and help you avoid cluttering up your desktop.

Be ruthless in decluttering

Once you have your folders set up, it’s time to get rid of the clutter. If you haven’t used a file or folder in the past two months or so, seriously consider getting rid of it. Uninstall programs you no longer use, delete images you no longer want or need, move unimportant files elsewhere, and place the rest in relevant folders.

Once you’re done, take a look at your browser to see where it stores downloaded files. If your browser downloads files to your desktop by default, go to Settings and change the target location to the Downloads folder.

Stick with your plan

Once you have decluttered your desktop, try to stick with the rules you’ve made. Whenever you download something, ask yourself whether it should go to the desktop or someplace else. Of course, sticking with these rules won’t always be easy, so aim to clean up your desktop at least once or twice a month.

Use the taskbar or Start menu for apps

Pinning apps to the Start menu and the taskbar is a great alternative to simply having program shortcuts on your desktop. To pin apps, go to the apps list via the Windows Start menu and right-click on the app you want to pin. Then, simply select Pin to Start or Pin to taskbar.

Strategically position your wallpaper

An interesting way to minimize clutter is to pick a wallpaper that you like, which could be your favorite picture or slogan. Frame the image so the focus is in the center of your desktop. Then, place your icons around the image in a way that allows you to still see the image. If you can no longer see the image, that means you have too many icons and it’s time to get rid of a few.

If you want to learn other ways to optimize your Windows PC, contact us today for more tips and tricks from office IT experts.

Everyone needs a fast, reliable PC in order to be productive. A slow computer cannot process multiple tasks efficiently and can hamper your productivity. One of the many causes of a sluggish computer is a cluttered desktop. Here are some fixes that will help reduce desktop clutter and improve your PC’s speed.

Do a bit of recon

Before decluttering your desktop, sort out which files and folders you need to keep and which ones you can let go of. For instance, you can OR you may want to delete files and folders that haven’t been opened in a long time. You can easily find these by right-clicking on an empty area of your desktop, selecting View, and then clicking Auto arrange icons. This will organize your icons into a grid format that makes them easier to view. Then, right-click once again on the empty space on your desktop and go to Sort by > Date modified. This will arrange the icons by the date they were last opened, with the latest on top.

Create holding and app shortcut folders

People often use their desktop folder to store downloads, photos, screenshots, email attachments, and other files, which easily messes up the desktop screen. To prevent these files from cluttering up your desktop, you should create a folder for nonessential files and folders. To create a folder on your desktop, simply right-click on an empty space on your desktop and then click New > Folder.

Use this folder to store temporary items, including those you’re keeping in the short term. Then, delete the files inside the folder once you no longer need them. You can also create a folder for shortcuts to frequently used programs. This will allow you to quickly find the program you need and help you avoid cluttering up your desktop.

Be ruthless in decluttering

Once you have your folders set up, it’s time to get rid of the clutter. If you haven’t used a file or folder in the past two months or so, seriously consider getting rid of it. Uninstall programs you no longer use, delete images you no longer want or need, move unimportant files elsewhere, and place the rest in relevant folders.

Once you’re done, take a look at your browser to see where it stores downloaded files. If your browser downloads files to your desktop by default, go to Settings and change the target location to the Downloads folder.

Stick with your plan

Once you have decluttered your desktop, try to stick with the rules you’ve made. Whenever you download something, ask yourself whether it should go to the desktop or someplace else. Of course, sticking with these rules won’t always be easy, so aim to clean up your desktop at least once or twice a month.

Use the taskbar or Start menu for apps

Pinning apps to the Start menu and the taskbar is a great alternative to simply having program shortcuts on your desktop. To pin apps, go to the apps list via the Windows Start menu and right-click on the app you want to pin. Then, simply select Pin to Start or Pin to taskbar.

Strategically position your wallpaper

An interesting way to minimize clutter is to pick a wallpaper that you like, which could be your favorite picture or slogan. Frame the image so the focus is in the center of your desktop. Then, place your icons around the image in a way that allows you to still see the image. If you can no longer see the image, that means you have too many icons and it’s time to get rid of a few.

If you want to learn other ways to optimize your Windows PC, contact us today for more tips and tricks from office IT experts.

The Windows 11 operating system is growing in popularity among businesses. However, just like its predecessor, it can have some intrusive privacy settings enabled by default. Luckily, you can easily turn these settings off to protect your privacy.

Turn off personalized advertising

Windows 11 features targeted ads as suggestions, recommendations, and tips on your device’s user interface. The operating system personalizes the ads a user sees based on computer activity and browser history. While personalized ads may direct users to helpful content, they can also be a hindrance to their productivity. To remove these distracting ads, here’s what you should do:

  • Click Start > Settings > Privacy & security.
  • Go to Diagnostics and feedback.
  • Find the Tailored experiences menu, and toggle it off.
  • Then, go back to Privacy & security and select General.
  • From there, turn off the “Let apps show me personalized ads by using my advertising ID” option.

You can also remove ads in Windows 11 notifications by doing the following:

  • Go to Start > Settings > System.
  • Select Notifications.
  • Scroll to the bottom of the page and disable the “Get tips and suggestions when it uses Windows” and “Offer suggestions on how I can set up my device options”.

Disable Cortana

Cortana is a personal assistant that allows users to set reminders, schedule events, and send emails, among other tasks. Every time you use Cortana, it collects information about your computer activity — “learning” it, so to speak — to improve user experience. But if you find this feature intrusive, you can disable Cortana completely with these steps:

  • Go to Settings > Apps > Apps and Features.
  • Find Cortana and open Advanced options by clicking on the three-dot icon.
  • Turn off the Run at log-in option.

Change Microsoft’s Edge settings

The Microsoft Edge web browser is chock full of features, such as web experience personalization and typing prediction. Such features may make you uncomfortable since they all send back data to Microsoft. Here’s how to turn them off:

  • Open Edge and click on the menu icon (three dots) in the upper-right corner.
  • Next, click on Settings > Privacy and services. Scroll down and switch on the “Send ‘Do Not Track’ requests” option.

There’s also a bunch of Privacy and Services settings that you may want to disable, such as tracking services, navigation error resolution, blocking potentially unwanted apps, and more.

For more tips on how to safeguard your security and privacy, drop us a line today. Our experts will be more than happy to help!

Windows 11 helps users by giving useful suggestions as they type and by displaying ads based on their online searches. But these can feel invasive, especially if you don’t want anyone prying into your online activity. To ensure your privacy and keep Microsoft’s watchful eye off your computer activity, follow these tips.

Turn off personalized advertising

Windows 11 features targeted ads as suggestions, recommendations, and tips on your device’s user interface. The operating system personalizes the ads a user sees based on computer activity and browser history. While personalized ads may direct users to helpful content, they can also be a hindrance to their productivity. To remove these distracting ads, here’s what you should do:

  • Click Start > Settings > Privacy & security.
  • Go to Diagnostics and feedback.
  • Find the Tailored experiences menu, and toggle it off.
  • Then, go back to Privacy & security and select General.
  • From there, turn off the “Let apps show me personalized ads by using my advertising ID” option.

You can also remove ads in Windows 11 notifications by doing the following:

  • Go to Start > Settings > System.
  • Select Notifications.
  • Scroll to the bottom of the page and disable the “Get tips and suggestions when it uses Windows” and “Offer suggestions on how I can set up my device options”.

Disable Cortana

Cortana is a personal assistant that allows users to set reminders, schedule events, and send emails, among other tasks. Every time you use Cortana, it collects information about your computer activity — “learning” it, so to speak — to improve user experience. But if you find this feature intrusive, you can disable Cortana completely with these steps:

  • Go to Settings > Apps > Apps and Features.
  • Find Cortana and open Advanced options by clicking on the three-dot icon.
  • Turn off the Run at log-in option.

Change Microsoft’s Edge settings

The Microsoft Edge web browser is chock full of features, such as web experience personalization and typing prediction. Such features may make you uncomfortable since they all send back data to Microsoft. Here’s how to turn them off:

  • Open Edge and click on the menu icon (three dots) in the upper-right corner.
  • Next, click on Settings > Privacy and services. Scroll down and switch on the “Send ‘Do Not Track’ requests” option.

There’s also a bunch of Privacy and Services settings that you may want to disable, such as tracking services, navigation error resolution, blocking potentially unwanted apps, and more.

For more tips on how to safeguard your security and privacy, drop us a line today. Our experts will be more than happy to help!

Do you feel like your online activity is being spied on? That’s because it probably is — but not by cybercriminals as you might think. It’s more likely that it’s your operating system that’s tracking your information. Learn more about Windows 11’s not-so-private settings and how to fix them to ensure your privacy.

Turn off personalized advertising

Windows 11 features targeted ads as suggestions, recommendations, and tips on your device’s user interface. The operating system personalizes the ads a user sees based on computer activity and browser history. While personalized ads may direct users to helpful content, they can also be a hindrance to their productivity. To remove these distracting ads, here’s what you should do:

  • Click Start > Settings > Privacy & security.
  • Go to Diagnostics and feedback.
  • Find the Tailored experiences menu, and toggle it off.
  • Then, go back to Privacy & security and select General.
  • From there, turn off the “Let apps show me personalized ads by using my advertising ID” option.

You can also remove ads in Windows 11 notifications by doing the following:

  • Go to Start > Settings > System.
  • Select Notifications.
  • Scroll to the bottom of the page and disable the “Get tips and suggestions when it uses Windows” and “Offer suggestions on how I can set up my device options”.

Disable Cortana

Cortana is a personal assistant that allows users to set reminders, schedule events, and send emails, among other tasks. Every time you use Cortana, it collects information about your computer activity — “learning” it, so to speak — to improve user experience. But if you find this feature intrusive, you can disable Cortana completely with these steps:

  • Go to Settings > Apps > Apps and Features.
  • Find Cortana and open Advanced options by clicking on the three-dot icon.
  • Turn off the Run at log-in option.

Change Microsoft’s Edge settings

The Microsoft Edge web browser is chock full of features, such as web experience personalization and typing prediction. Such features may make you uncomfortable since they all send back data to Microsoft. Here’s how to turn them off:

  • Open Edge and click on the menu icon (three dots) in the upper-right corner.
  • Next, click on Settings > Privacy and services. Scroll down and switch on the “Send ‘Do Not Track’ requests” option.

There’s also a bunch of Privacy and Services settings that you may want to disable, such as tracking services, navigation error resolution, blocking potentially unwanted apps, and more.

For more tips on how to safeguard your security and privacy, drop us a line today. Our experts will be more than happy to help!

Windows 11 is here, and many users are wondering whether they should upgrade. The new Microsoft operating system (OS) introduces quite a few nifty features, but it also has its share of controversies. So, should you take the plunge? Here are some things you need to know before making that decision.

1. Your computer doesn’t meet Windows 11 minimum system requirements

One of the main reasons that can keep you from upgrading to Windows 11 is that your computer might not be able to run it. Windows 11’s system requirements are quite high: your computer needs 1 gigahertz (GHz) or faster with two or more cores on a compatible 64-bit processor or system on a chip (SoC). It also needs at least 4 gigabytes (GB) of RAM and 64 GB of available storage.

Although these standards aren’t extraordinary, a considerable number of users have outdated hardware that doesn’t meet Microsoft’s requirements for Windows 11. If you are one of them, you may need to purchase a new PC to get the latest OS.

2. Windows 11 has a lot of bugs

Windows 11 is still fresh out of the oven, and it’s far from being bug-free. Users have reported compatibility issues, missing notifications, and some built-in applications not opening or working as expected. The OS is still missing some features available in Windows 10, and issues are constantly being discovered and fixed, but these are to be expected of any newly released OS. So if you want to stick with a stable and reliable OS, it’s better to wait until Windows 11 is more mature.

3. You can’t access Android apps directly from Windows 11 (yet)

The Your Phone app currently lets Android phone users access mobile apps directly from their Windows 10 PC. This is an especially useful feature for remote and hybrid employees, as the ability to access phone apps on a larger desktop or laptop display and use a mouse, pen, or touchscreen helps with multitasking. If you are one of the people who rely on this feature, you’ll have to wait for the next Windows 11 update to get this functionality.

4. Windows 11 is very similar to Windows 10

Windows 11 wasn’t intended to be a new version of the OS. It was meant to be a substantial update to Windows 10, initially called the Sun Valley Update. That’s why save for a few features, many apps and functions look and work the same in Windows 11 as they do in Windows 10. So unless you’re looking for something radically different from what you have now, it may not be worth upgrading.

5. Microsoft will continue to support Windows 10 until 2025

If you are comfortable with your current setup and don’t have any urgent need to upgrade, you might as well stick with Windows 10. Microsoft has stated that it will continue to support the OS until October 14, 2025. This means that Windows 10 won’t become obsolete in the near future, so you can still enjoy bug fixes, security updates, and new features for this OS version for a few more years.

These are just some of the reasons why you may want to stick with Windows 10. If you decide that upgrading to Windows 11 is right for you, go ahead! But if not, there’s no need to worry — Windows 10 will still be here for a while. Either way, our experts can help you make the most out of your Windows setup. Give us a call today to learn more.

Windows 11 is out. And with its sleek design and new features, it’s no wonder that so many people are considering upgrading. But should you switch to the newest Microsoft operating system (OS)? Here are some reasons why you may want to wait.

1. Your computer doesn’t meet Windows 11 minimum system requirements

One of the main reasons that can keep you from upgrading to Windows 11 is that your computer might not be able to run it. Windows 11’s system requirements are quite high: your computer needs 1 gigahertz (GHz) or faster with two or more cores on a compatible 64-bit processor or system on a chip (SoC). It also needs at least 4 gigabytes (GB) of RAM and 64 GB of available storage.

Although these standards aren’t extraordinary, a considerable number of users have outdated hardware that doesn’t meet Microsoft’s requirements for Windows 11. If you are one of them, you may need to purchase a new PC to get the latest OS.

2. Windows 11 has a lot of bugs

Windows 11 is still fresh out of the oven, and it’s far from being bug-free. Users have reported compatibility issues, missing notifications, and some built-in applications not opening or working as expected. The OS is still missing some features available in Windows 10, and issues are constantly being discovered and fixed, but these are to be expected of any newly released OS. So if you want to stick with a stable and reliable OS, it’s better to wait until Windows 11 is more mature.

3. You can’t access Android apps directly from Windows 11 (yet)

The Your Phone app currently lets Android phone users access mobile apps directly from their Windows 10 PC. This is an especially useful feature for remote and hybrid employees, as the ability to access phone apps on a larger desktop or laptop display and use a mouse, pen, or touchscreen helps with multitasking. If you are one of the people who rely on this feature, you’ll have to wait for the next Windows 11 update to get this functionality.

4. Windows 11 is very similar to Windows 10

Windows 11 wasn’t intended to be a new version of the OS. It was meant to be a substantial update to Windows 10, initially called the Sun Valley Update. That’s why save for a few features, many apps and functions look and work the same in Windows 11 as they do in Windows 10. So unless you’re looking for something radically different from what you have now, it may not be worth upgrading.

5. Microsoft will continue to support Windows 10 until 2025

If you are comfortable with your current setup and don’t have any urgent need to upgrade, you might as well stick with Windows 10. Microsoft has stated that it will continue to support the OS until October 14, 2025. This means that Windows 10 won’t become obsolete in the near future, so you can still enjoy bug fixes, security updates, and new features for this OS version for a few more years.

These are just some of the reasons why you may want to stick with Windows 10. If you decide that upgrading to Windows 11 is right for you, go ahead! But if not, there’s no need to worry — Windows 10 will still be here for a while. Either way, our experts can help you make the most out of your Windows setup. Give us a call today to learn more.