Steve Thomas - IT Consultant

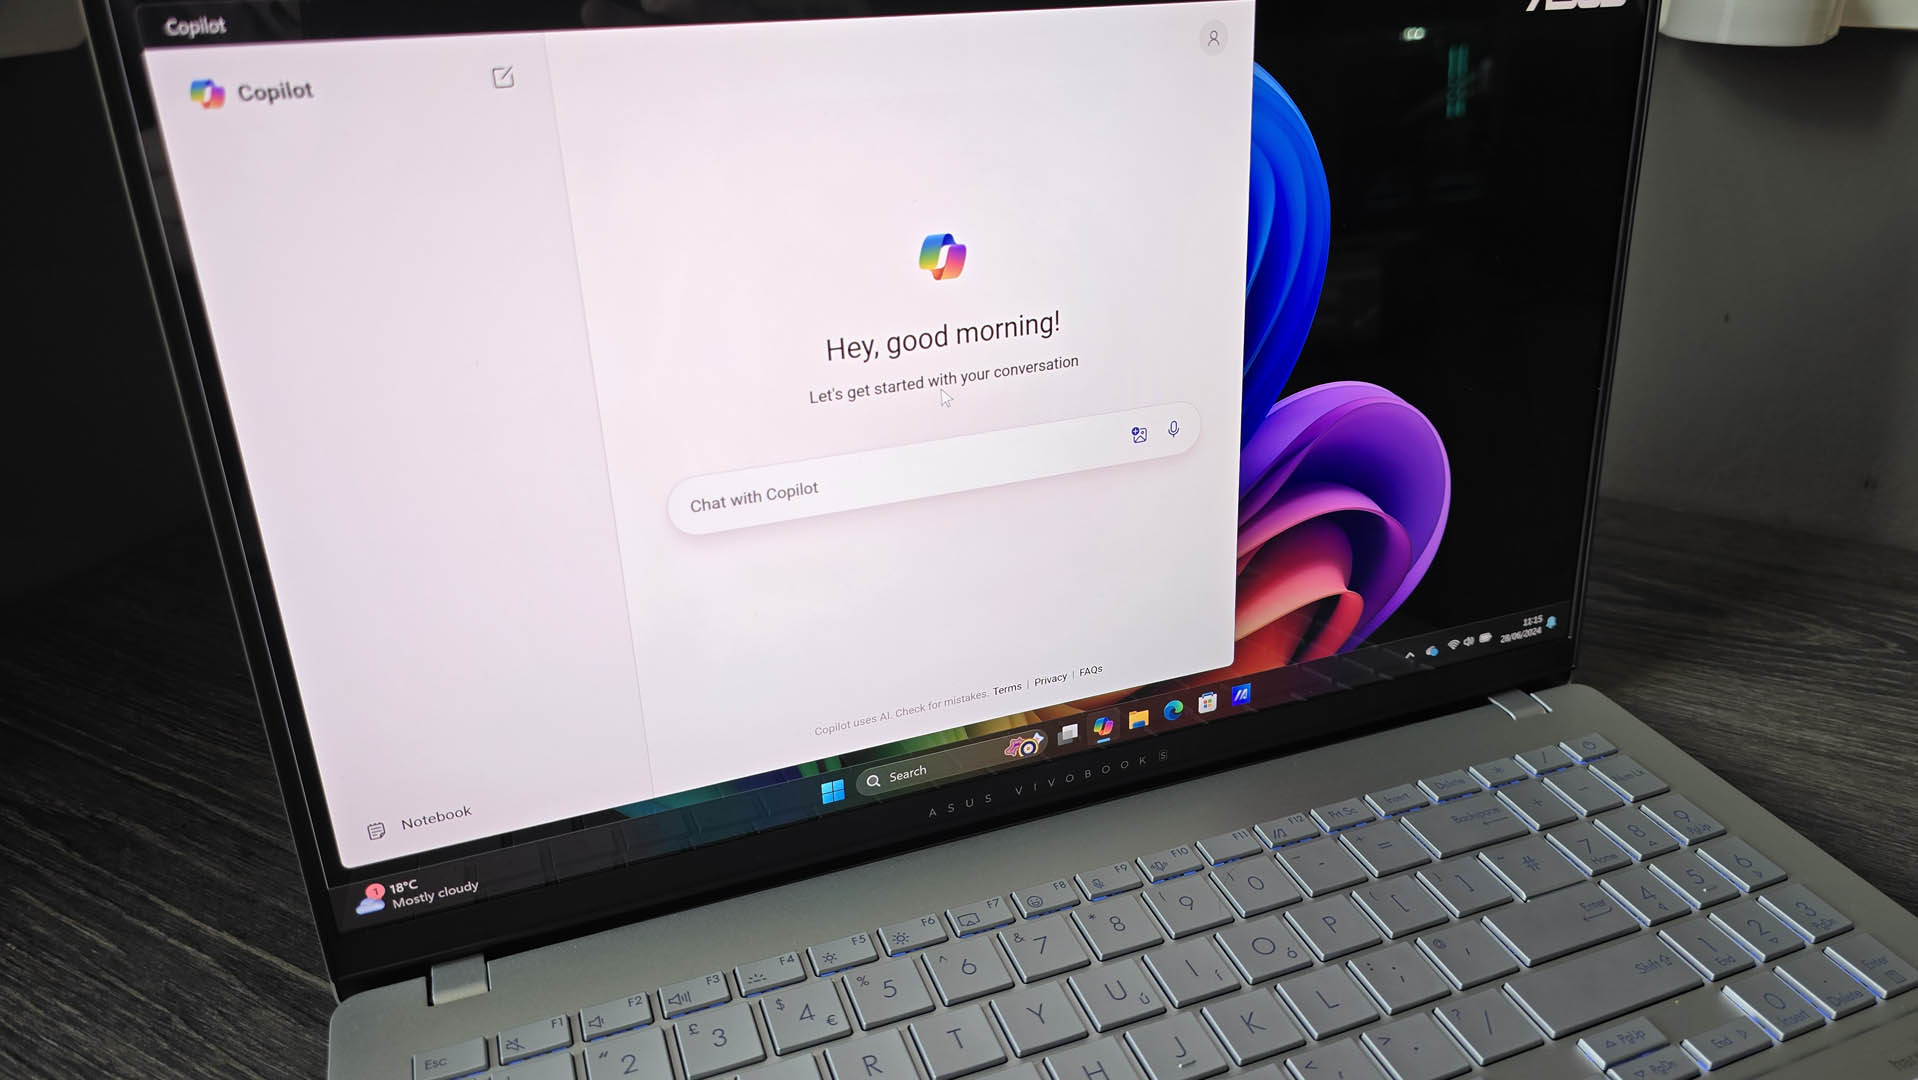
Windows 11’s Recall feature has had a short but distinctly tumultuous existence, and following recent news of the AI-powered supercharged search returning to Windows 11 (in testing), we’re now hearing that Recall might come with the option to uninstall it – albeit with a weighty caveat.

Deskmodder, a German tech site, discovered that the latest Windows 11 update (an optional one that comes with a huge boost for modern AMD Ryzen CPUs) includes a stealthily-introduced choice to uninstall Recall.

This would be a big change of direction from Microsoft, as when first announced, the idea was Recall was fully built-in to Windows 11 (on Copilot+ PCs, as it requires a powerful NPU), but users could disable it if they didn’t want AI poking around in their files and regularly taking screenshots of everything that happens on their PC (which is a crude way of putting how Recall works).

To be able to strip it out entirely would surely be a boon for those more paranoid about these kind of AI features. Not having the code kicking about in your Windows 11 installation anywhere at all is clearly a step up from disabling Recall.

However, there’s a bit of extra spin on this one, as Windows Central, which noticed this development points out, the rules of Windows can be quite different in the EU to elsewhere.

As Deskmodder is a German website, it could be the case that Windows 11 in EU countries will get this option to completely remove Recall, whereas other regions won’t. After all, this is already the case for a number of Microsoft apps and services, including Edge and Bing to pick a couple of notable examples.


The Asus Vivobook S 15 Copilot+ in silver pictured on a wooden desk.

(Image credit: Future)

Analysis: A not so hopeful outlook

Sadly, we feel that if this comes to anything – and it may not – this is likely to be part of Microsoft’s measures to deal with tighter EU privacy and data regulations, than any move to actually give users more choice over what they should have present in their Windows 11 installation. The truth is Microsoft will want people to use Recall – and all its shiny new AI features – to make Copilot+ PCs look more innovative and useful, and therefore more likely to sell (which they are certainly predicted to do).

If Recall is right there in the OS, this makes it more likely for folks to use it, quite simply. Microsoft won’t want a situation where the feature can be completely ripped out, so if a user happens to be mulling using it down the line – and they took it out before – it feels like an extra hassle to reinstall Recall, maybe leading to them not bothering.

We can’t see it any other way but Microsoft wanting to have Recall in the background, with it disabled, rather than any other route. We may, of course, be wrong – and we hope so – because it wouldn’t hurt for the particularly cautious to get a way of completely removing Recall.

Microsoft will, however, be very careful about how it treads with the way Recall is implemented now it’s heading back to testing. When Recall was first announced, there was a storm of controversy immediately, which only worsened as people fudged their Windows 11 installations to play with the feature early – opening cans of security and privacy-related worms left, right and center.

It was supposed to be released in preview on Copilot+ PCs, but Recall was dropped from the launch of these AI laptops, and shuttled off to Windows 11 preview builds instead – except that soon after, Microsoft dropped the idea of testing Recall with Windows Insiders, even, essentially going back to the drawing board with the feature.

In all honesty, we felt that was necessary – a thorough revamp for the feature, as Recall clearly hadn’t been thought through well enough – but Microsoft then stayed silent on the functionality for a long time, leading some to speculate about whether it might even be dead in the water perhaps. That’s not the case, of course, as Microsoft broke that lengthy silence just last week with the announcement that Recall is coming back to preview builds of Windows 11 in October.

To say its return will be watched with great interest would be an understatement – but whatever Microsoft has done with Recall, it better be very clear to the user what the feature is doing when offering the choice to enable it. (Recall will be off by default, by the way – another change Microsoft was forced into making).

You might also like...

Windows 11 has a new preview build, and it comes with a few notable changes to the interface – for the better, thankfully, with no new adverts or promos anywhere to be seen.

Microsoft just introduced Windows 11 build 22635 (KB5041876) in the Beta channel, and the most interesting change is a hidden one, as flagged up by regular leaker PhantomOfEarth on X (who regularly uncovers features that aren’t live in testing yet by enabling them via a Windows configuration tool).

As you can see in the above post, the Start menu’s (hidden) ‘All apps’ category view now has not just icons representing all the apps shown in each category, but tooltips for their names when you hover the cursor over them.

The categories are mentioned in a follow-up tweet, as they have now been changed to mirror the same categories used in the Microsoft Store, the leaker observes based on a clue unearthed when rifling through Windows 11’s Start menu assets.

Elsewhere in build 22635, as Microsoft explains in the usual blog post, there’s been some work on the lock screen, whereby media controls are now shown at the bottom of the screen when audio content is being played. This comes complete with a blur effect on the visuals that’s a nice touch, PhantomOfEarth notes elsewhere.

On top of that, Microsoft has modified another tweak made in testing in the past, namely the introduction of notification suggestions, whereby Windows 11 will suggest turning off notification toasts from any given app if you don’t interact with them for some time. This preview build witnesses the ability to turn off those suggestions (as opposed to the notifications themselves, we should clarify).

There’s the usual bunch of fixes here too, including resolutions for crashes with File Explorer and the Start menu.


Happy laptop user

(Image credit: Ollyy / Shutterstock)

Analysis: More choice is always good

It’s good to see that work is progressing nicely on the new category view in the All apps panel. As we’ve discussed before, this is a refreshing change of layout from the default list of apps in the Start menu, a clunky affair that’s simply presented in alphabetical order (leaving you with a lot of scrolling to do, potentially, if you have lots of software installed).

Those who feel the category layout is perhaps more cluttered to look at, and prefer the list view as they feel it’s more streamlined, will be able to stick with it, by the way. A choice is set to be offered including the default list, this new category view, and another grid view which is also in preview (if the latter two options ever emerge from testing, that is – they may not, only time will tell).

For us, we feel that pinpointing apps using organized categories could be pretty handy, though it’s not surprising to see Microsoft adopt the categories used in its store here -hopefully, that’s not a sign that the store is going to be promoted somehow in this fresh take on the interface.

The way things are going, we assume this functionality will be live in a preview build before too long, but it’s probably too late to make the cut for Windows 11 24H2 at this stage.

You might also like...

Windows 11 and Windows 10 aren’t on the brink of seeing the Control Panel shuffling off into the sunset, Microsoft has clarified.

As Ars Technica reports, this follows a string of articles last week that popped up around the Control Panel – which is nearly 40-years-old and plays host to a bunch of settings and options not catered for in Windows 11’s Settings app, many of which are legacy affairs – insisting Microsoft was in the process of killing it off, finally.

That conclusion was mainly based on a sentence in a support article about system tools in Windows that said: “The Control Panel is in the process of being deprecated in favor of the Settings app, which offers a more modern and streamlined experience.”

This official announcement of the deprecation – meaning the feature is frozen, and marked for removal (but still present in Windows) – was the first time we’d heard Microsoft formally talk about pushing the Control Panel out of the exit door. Even if it’s been clear enough that this is the process the software giant is engaged in, and has been for a long time now – it’s just a very slow, drawn out death for the panel.

However, Microsoft has changed the language in that document, and the Control Panel section now reads: “Many of the settings in Control Panel are in the process of being migrated to the Settings app, which offers a more modern and streamlined experience.”

Man with a CRT monitor showing the Windows 11 control panel for a head

(Image credit: IvaFoto / Shutterstock / Microsoft)

The ghost of Windows past

The change in emphasis is clear, then, moving away from any talk of deprecation or marking the Control Panel for removal, and letting us know that the lifting and shifting of features from the panel to the Settings app is still very much an ongoing process.

As Ars Technica points out, though, we don’t know the reasoning behind the change of wording. Was this a formal decision Microsoft has reversed based on the reports that flooded out last week (and perhaps some negative feedback from some quarters)? Or has Microsoft not made any decision at all, and just badly worded the update to the support document, and had to clarify what it meant – or rather, didn’t mean – as a result?

We strongly suspect the latter, because the Control Panel has never been on Microsoft’s official list of deprecated features for Windows 11 (or 10) – and you’d think it would show up there first, rather than an announcement like this leaking out via a Windows support page.

Besides, we can’t quite see why Microsoft would have to reverse the decision, if it was made, anyway – who doesn’t want to see the back of the Control Panel, if its demise was really happening? Taking a stroll through the Control Panel’s various sections is a bit like being haunted by old versions of Windows, with features and interface graphics that date back to the nineties. (Although, to be fair, there are some niche functions in here which some users really would miss).

At any rate, to sum up: the Control Panel will probably be with us for quite some time yet, and at least until the next version of Windows, whether that’s Windows 12 or something entirely different. And likely it’ll remain in place for a while even in that new OS, while those more important niche features are shuffled across to Settings.

Do note that in the mentioned support document, Microsoft is still encouraging folks to use the Settings app, rather than the Control Panel, wherever possible.

You might also like...

We’ve heard before that Windows 11 could be getting a ‘hot-patching’ feature with version 24H2, arriving later this year, whereby (some) future cumulative updates won’t require a reboot – and we’ve just been treated to another clue that this might come to fruition.

Windows Latest reports that PhantomOfEarth on X flagged up a new support article for hot-patching in Windows 11, though there’s a twist here in that it was evidently accidentally published – and swiftly yanked down by Microsoft.

The post can still be viewed using the Wayback Machine but as you’ll see if you take a look, the article is just a copy-and-paste of guidelines for crafting a support document (which, as mentioned, has clearly been mistakenly published).

The key part here is that Microsoft beavering away in the background with content relating to hot-patching for Windows Ge or Germanium – which is Windows 11 24H2, with Germanium being the codename of the new platform it’s built on – is a heavy hint that this is indeed inbound. If not, why be working on any material pertaining to hot-patching at all, at this point?

A seamless way of updating Windows 11

Given the date mentioned in the now-retracted article, which is 2024.08, this suggests we might see some kind of update from Microsoft on hot-patching functionality incoming for Windows 11 before the end of August.

Of course, all this could still come to nothing – but this does seem to be a feature Microsoft is planning, according to previous info from Zac Bowden, a reliable leaker on all things Windows.

Indeed, Bowden claimed that it’s planned for the 24H2 update, and he explained a bit more about how hot-patching would work in an info dump early this year. The long and short of it is that only some cumulative updates (the monthly patches that arrive for Windows 11) would be applied without a reboot – two in a row – before the third baseline cumulative update is pushed out that does need a reboot. Meaning two-thirds of updates would be hot-patched, but do note that the big annual updates for Windows 11 – like 24H2 – always necessitate a reboot, as these are far larger in scope, naturally.

It’d be pretty cool to have some of Windows 11’s monthly patches downloaded and installed on your PC seamlessly, with no need to reboot, so you can just keep on working (or gaming, or whatever you’re doing).

It’ll also remove that small amount of danger involved every time you reboot for an update on a desktop PC, where you pray that a power cut won’t strike. As if your PC is switched off during an update of any kind, that might be bad news, and could result in corrupted files – and maybe the OS not booting up at all, if you’re really unlucky.

You might also like...

Windows 10 might get an unpopular change to the Start menu which Microsoft recently implemented in Windows 11, going by a new leak.

This is the addition of an account manager section, and that piece of extra clutter in the Start menu could well be coming to Windows 10, as the functionality is currently in test builds – though it isn’t yet live.

Leaker PhantomOfEarth on X made the discovery by poking around in a Windows 10 preview (build 19045.4842) and enabling the feature with a Windows configuration utility.

If this change comes to Windows 10 in the same form as Windows 11, it means that when you click your profile picture (bottom-left of the Start menu), instead of useful shortcuts to lock your PC, or sign out of your account, you’ll instead get reminders (and promotional bits) for your Microsoft Account (or other services, potentially).

The mentioned shortcuts haven’t been ditched, but instead they’re hidden away in the new panel, accessed via a three-dot menu. Mind you, that three-dot menu doesn’t do anything yet in Windows 10, underlining that this feature isn’t complete yet, it’s just kicking about in the background for now.


Windows 10 touch interface

(Image credit: Shutterstock)

Analysis: The unfortunate downside of Windows 10’s feature thaw

We do have to remember that this isn’t even present in testing yet, but with the works in place under the hood, and the fact that it’s already live in Windows 11 – and also given Microsoft’s general push to get more promotional-verging-on-advertising stuff into both operating systems – it seems pretty likely this will happen. We mustn’t count our interface aberrations before they hatch, though.

This is a particularly annoying one as it buries useful functionality – or at least shortcuts that some Windows users avail themselves of – behind an extra click (on that three-dot menu). It’s a permanent inconvenience for those affected, while offering nothing really useful in the way of an addition, and the feedback around this has been quite bitter as a result.

To see Microsoft apparently pushing forward with the move in Windows 10 is a bit surprising in this light, perhaps, but again – we can’t be sure the change will be implemented in the older OS.

At one point last year, Microsoft froze work on Windows 10, and we thought the operating system was going to get nothing but security updates until it reached End of Life. Then the software giant reversed course and kept features coming for Windows 10, but here we see the (possible) downside of that continued development – where rubbish ‘features’ no one really wants are also getting backported from Windows 11.

That said, we wouldn’t wish for a halt on Windows 10 development to avoid this kind of thing, although Microsoft will stop work on the older OS before too long, no doubt – support for Windows 10 runs out in not much more than a year, after all.

You might also like...

Want to make the most of your Windows 11 PC? Removing bloatware is a crucial step. Learn how to easily uninstall unnecessary applications and declutter your system for a smoother and more efficient experience.

What is bloatware?

Bloatware, also known as junkware or crapware, refers to preinstalled software on your device that is often unnecessary and takes up storage space and resources. These programs are typically added by manufacturers or third-party vendors and can include trial versions of software, games, toolbars, and more.

While some of these preinstalled apps may be useful, most of them are not essential for your device to function properly. In fact, they can slow down your PC and even pose security risks. Removing bloatware can improve system performance, reduce storage usage, and protect your privacy.

How to remove bloatware in Windows 11

There are several ways to remove bloatware in Windows 11, depending on your level of technical expertise and the type of bloatware you want to remove.

Using the Settings menu

This method is ideal for removing one or two apps at a time and is easy to follow for users of all levels.

  1. Open the Settings menu by clicking on the gear icon in the Start menu or pressing Windows + I on your keyboard.
  2. Click on Apps from the list of options.
  3. Under the Apps & features section, you’ll see a list of all installed apps on your device. Scroll through the list and click on any app you want to remove.
  4. Click on the Uninstall button that appears and confirm your choice when prompted.
  5. Repeat the process for any other apps you want to remove.

Using the Control Panel

If you have a bit more technical knowledge, you can use the Control Panel to remove bloatware.

  1. Type “Control Panel” in the search bar or press Windows + R on your keyboard and type “control panel” in the Run box.
  2. Click on the Control Panel app from the search results or click OK if using the Run box.
  3. From the list of options, click on Programs > Programs and Features. You’ll see a list of all installed programs on your device, including bloatware.
  4. Double-click or right-click on any program you want to remove and select Uninstall.
  5. Follow the prompts to complete the process, and repeat step 4 for any other apps you want to remove.

Using PowerShell

Some bloatware may be more stubborn to remove and cannot be uninstalled through the above methods. In this case, you can use PowerShell. Note that this method requires some technical knowledge and should be used with caution, as it involves running commands that can affect your device.

  1. Type “PowerShell” in the search bar or press Windows + X on your keyboard and select Windows PowerShell (Admin) from the menu.
  2. When prompted, click Yes to allow the app to make changes to your device. The PowerShell window will open.
  3. Type the command “Get-AppxPackage -AllUsers” and press Enter. This will show a list of all installed apps on your device.
  4. Identify the bloatware you want to remove from the list and note down its name (in the Name column).
  5. Type the command “Remove-AppxPackage [PackageName]” where [PackageName] is replaced with the name of the app you want to remove, and press Enter.
  6. Repeat step 5 for any other apps you want to remove.
  7. To remove all bloatware at once, type the command “Get-AppxPackage -AllUsers | Remove-AppxPackage” and press Enter. This will remove all preinstalled apps on your device.

Using a bloatware removal tool

If manually removing bloatware seems overwhelming or you want a more thorough removal, there are also third-party bloatware removal tools available. These tools scan your device for potential bloatware and allow you to remove them with just a few clicks. Some can even detect malware or adware disguised as bloatware.

After removing bloatware, be sure to restart your computer to confirm the changes are applied.

For further insights into optimizing Windows 11, contact our specialists today.

Is your Windows 11 PC feeling sluggish? Bloatware might be the culprit. Unwanted software can take up valuable storage space and slow down your system. In this article, we’ll provide step-by-step instructions on how to identify and remove bloatware from your computer.

What is bloatware?

Bloatware, also known as junkware or crapware, refers to preinstalled software on your device that is often unnecessary and takes up storage space and resources. These programs are typically added by manufacturers or third-party vendors and can include trial versions of software, games, toolbars, and more.

While some of these preinstalled apps may be useful, most of them are not essential for your device to function properly. In fact, they can slow down your PC and even pose security risks. Removing bloatware can improve system performance, reduce storage usage, and protect your privacy.

How to remove bloatware in Windows 11

There are several ways to remove bloatware in Windows 11, depending on your level of technical expertise and the type of bloatware you want to remove.

Using the Settings menu

This method is ideal for removing one or two apps at a time and is easy to follow for users of all levels.

  1. Open the Settings menu by clicking on the gear icon in the Start menu or pressing Windows + I on your keyboard.
  2. Click on Apps from the list of options.
  3. Under the Apps & features section, you’ll see a list of all installed apps on your device. Scroll through the list and click on any app you want to remove.
  4. Click on the Uninstall button that appears and confirm your choice when prompted.
  5. Repeat the process for any other apps you want to remove.

Using the Control Panel

If you have a bit more technical knowledge, you can use the Control Panel to remove bloatware.

  1. Type “Control Panel” in the search bar or press Windows + R on your keyboard and type “control panel” in the Run box.
  2. Click on the Control Panel app from the search results or click OK if using the Run box.
  3. From the list of options, click on Programs > Programs and Features. You’ll see a list of all installed programs on your device, including bloatware.
  4. Double-click or right-click on any program you want to remove and select Uninstall.
  5. Follow the prompts to complete the process, and repeat step 4 for any other apps you want to remove.

Using PowerShell

Some bloatware may be more stubborn to remove and cannot be uninstalled through the above methods. In this case, you can use PowerShell. Note that this method requires some technical knowledge and should be used with caution, as it involves running commands that can affect your device.

  1. Type “PowerShell” in the search bar or press Windows + X on your keyboard and select Windows PowerShell (Admin) from the menu.
  2. When prompted, click Yes to allow the app to make changes to your device. The PowerShell window will open.
  3. Type the command “Get-AppxPackage -AllUsers” and press Enter. This will show a list of all installed apps on your device.
  4. Identify the bloatware you want to remove from the list and note down its name (in the Name column).
  5. Type the command “Remove-AppxPackage [PackageName]” where [PackageName] is replaced with the name of the app you want to remove, and press Enter.
  6. Repeat step 5 for any other apps you want to remove.
  7. To remove all bloatware at once, type the command “Get-AppxPackage -AllUsers | Remove-AppxPackage” and press Enter. This will remove all preinstalled apps on your device.

Using a bloatware removal tool

If manually removing bloatware seems overwhelming or you want a more thorough removal, there are also third-party bloatware removal tools available. These tools scan your device for potential bloatware and allow you to remove them with just a few clicks. Some can even detect malware or adware disguised as bloatware.

After removing bloatware, be sure to restart your computer to confirm the changes are applied.

For further insights into optimizing Windows 11, contact our specialists today.

Tired of your Windows 11 laptop or desktop running slower than it should? It might be time to tackle the bloatware that’s slowing it down. In this guide, we’ll show you how to identify and remove unwanted preinstalled apps, freeing up valuable resources and improving your overall PC experience.

What is bloatware?

Bloatware, also known as junkware or crapware, refers to preinstalled software on your device that is often unnecessary and takes up storage space and resources. These programs are typically added by manufacturers or third-party vendors and can include trial versions of software, games, toolbars, and more.

While some of these preinstalled apps may be useful, most of them are not essential for your device to function properly. In fact, they can slow down your PC and even pose security risks. Removing bloatware can improve system performance, reduce storage usage, and protect your privacy.

How to remove bloatware in Windows 11

There are several ways to remove bloatware in Windows 11, depending on your level of technical expertise and the type of bloatware you want to remove.

Using the Settings menu

This method is ideal for removing one or two apps at a time and is easy to follow for users of all levels.

  1. Open the Settings menu by clicking on the gear icon in the Start menu or pressing Windows + I on your keyboard.
  2. Click on Apps from the list of options.
  3. Under the Apps & features section, you’ll see a list of all installed apps on your device. Scroll through the list and click on any app you want to remove.
  4. Click on the Uninstall button that appears and confirm your choice when prompted.
  5. Repeat the process for any other apps you want to remove.

Using the Control Panel

If you have a bit more technical knowledge, you can use the Control Panel to remove bloatware.

  1. Type “Control Panel” in the search bar or press Windows + R on your keyboard and type “control panel” in the Run box.
  2. Click on the Control Panel app from the search results or click OK if using the Run box.
  3. From the list of options, click on Programs > Programs and Features. You’ll see a list of all installed programs on your device, including bloatware.
  4. Double-click or right-click on any program you want to remove and select Uninstall.
  5. Follow the prompts to complete the process, and repeat step 4 for any other apps you want to remove.

Using PowerShell

Some bloatware may be more stubborn to remove and cannot be uninstalled through the above methods. In this case, you can use PowerShell. Note that this method requires some technical knowledge and should be used with caution, as it involves running commands that can affect your device.

  1. Type “PowerShell” in the search bar or press Windows + X on your keyboard and select Windows PowerShell (Admin) from the menu.
  2. When prompted, click Yes to allow the app to make changes to your device. The PowerShell window will open.
  3. Type the command “Get-AppxPackage -AllUsers” and press Enter. This will show a list of all installed apps on your device.
  4. Identify the bloatware you want to remove from the list and note down its name (in the Name column).
  5. Type the command “Remove-AppxPackage [PackageName]” where [PackageName] is replaced with the name of the app you want to remove, and press Enter.
  6. Repeat step 5 for any other apps you want to remove.
  7. To remove all bloatware at once, type the command “Get-AppxPackage -AllUsers | Remove-AppxPackage” and press Enter. This will remove all preinstalled apps on your device.

Using a bloatware removal tool

If manually removing bloatware seems overwhelming or you want a more thorough removal, there are also third-party bloatware removal tools available. These tools scan your device for potential bloatware and allow you to remove them with just a few clicks. Some can even detect malware or adware disguised as bloatware.

After removing bloatware, be sure to restart your computer to confirm the changes are applied.

For further insights into optimizing Windows 11, contact our specialists today.

Windows 11 can be installed on PCs that don’t meet the hardware requirements of the OS by using a few different workarounds, but one of those fudges no longer works – or at least Microsoft appears to have closed this loophole in testing.

The Register reports that as highlighted by Bob Pony on X, the bypass that Microsoft apparently intends to block, known as the ‘setup.exe /product server’ workaround, has indeed been vanquished in preview build 27686 in the Canary channel (released a week ago).

What this particular requirement-dodging measure does is to trick the installer into thinking it is setting up Windows Server, when it is in fact installing Windows 11. As Windows Server doesn’t have the same stricter requirements – for example, you don’t need TPM 2.0 – this sneaky installation method will work on a PC that doesn’t officially qualify for Windows 11.

Whether it will run properly on such a PC is entirely another matter, and that’s why we wouldn’t recommend using a trick along these lines.

That said, people do use this, and other fudges, to install Windows 11 on hardware that is older and not officially compatible, and they manage to run it okay – but it’s a risk, obviously.


Analysis: A bug, maybe? It seems unlikely…

As The Register points out, it is possible that this is just a bug in the Windows 11 preview build. After all, this is the Canary channel, the earliest testing platform which is more bug-ridden than other builds.

However, it’s more probable that this is an intentional move by Microsoft, we’d guess. That being the case, folks do still have time to use the above fudge to install Windows 11, because as Bob Pony makes clear, it still works fine with Windows 11 24H2 (the incoming update expected to land later in the year). This is seemingly a change for Windows 11 in 2025 – but we don’t know for sure, and Microsoft could still be planning on incorporating it in the 24H2 update (it just isn’t in the mix yet).

Another well-known workaround to fudge an installation of Windows 11 on an unsupported PC is to use the utility Rufus. So, there are still options out there, although Microsoft is seemingly looking to close these kind of tricks down – perhaps due to the fact that Windows 10 comes to its End of Life next year.

Whatever the case, we should underline that we wouldn’t recommend installing any operating system on a device that doesn’t officially support it – at least not for the average user out there, anyway.

You might also like...

Windows 11 is getting a new ability with the 24H2 update which means that more than just one app will be able to access the webcam without having to work around this with a fudge.

Yes, if you weren’t aware, it’s currently the case for Windows 11 that the OS (and other Windows versions, for that matter) only allows one app access to the camera at any one time.

As Windows Latest reports, currently the only way around this is that if there’s a second app that needs to use the webcam at the same time as an initial app which has grabbed the hardware, you can use a virtual camera setup to do so.

However, Windows 11 should be able to natively handle multiple apps tapping the webcam simultaneously with a new option in the 24H2 update, as leaker PhantomOfEarth highlighted with a post on X.

As you can see, the feature will be in the Camera settings, courtesy of an ‘Advanced camera configuration’ panel that’ll allow the user to enable multi-app camera, which allows multiple apps to simultaneously stream from the camera.

Note that this ability is just in testing right now, and it’s hidden in the latest Windows 11 preview in the Dev channel, in fact. Hopefully, it’ll be live soon enough though, and can be tested and run through its paces before full release.


Lenovo Legion 5i (Gen 9) showing webcam at top of the screen

(Image credit: Future)

Analysis: A throwback of a limitation

While multiple apps using the webcam may not be a common scenario for many Windows 11 users, it’s a useful ability that some folks want, and as Microsoft notes in the text for the feature, it’s “designed for the hard-of-hearing community” – so this is yet another useful step forward on the accessibility front, too. (We aren’t sure what scenarios this might be leveraged in, but hopefully when the feature actually goes live in testing, Microsoft will explain in more detail what this does in the usual blog post announcing all the new bits and pieces).

You might be wondering why Windows 11 (or previous versions of the OS) doesn’t support multiple webcams anyway? It doesn’t seem like a massive ask, after all. Well, seemingly this is a throwback to past times when hardware wasn’t as beefy as it is today, and sharing the camera between numerous apps could cause system slowdown for lesser PCs.

As Windows Latest observes, it seems Microsoft implemented a fundamental rule to prevent this – one app at a time working with the webcam – and just hasn’t changed that in ages. There’s no reason for the restriction now, so it’s (finally) being lifted – at least assuming this change progresses through Windows 11’s testing channels and onto release (and we can’t see why it wouldn’t).

There are other slight complications with multiple apps sharing the one webcam, such as image settings like brightness having different parameters demanded by the different apps using the camera. To get around this, Microsoft is having brightness and so forth controlled at a central point in Windows 11’s settings, which overrides any app settings, and that of course fully makes sense.

You might also like...

Windows 11 has received some useful tweaks to enable laptop owners to get more battery life, although these changes are still in testing right now.

Microsoft implemented a couple of measures in the latest preview build (27686) in the Canary channel (the earliest testing channel).

The major change is actually under the hood here, and in its blog post for build 27686, Microsoft says that it has enacted various “optimizations to improve battery life” without going into any details of exactly what has been done.

More recently, as Tom’s Hardware spotted, Microsoft made another change with this build, as the company explains: “We’re beginning to roll out improvements to Settings > System > Power & battery including the ability to set your Power Mode for both when your PC is plugged in [and] when it’s on battery along with a few other UI improvements to the page.”

Actually, the ability to change your power preferences depending on whether your laptop is plugged in, or running on battery, has always been possible with Windows 11 – you just had to dig deeper into the settings for the OS to change these options.

Now, Microsoft is putting them in a more accessible place where Windows 11 users will be able to see and easily switch these options, right there in the Power & battery panel.


A bearded man sitting at a table that has a laptop and a second monitor

(Image credit: Shutterstock/Zamrznuti tonovi)

Analysis: On the cutting-edge of testing

Clearly, making the settings for changing your power mode in Windows 11 much easier to see and adjust is a good thing. We can’t imagine this change won’t make it through the various testing channels and on to the release version of Windows 11 before too long.

The other move here in the optimizations to extend battery life is a bit different. Microsoft sounds less sure of the impact here, as when asking for feedback on the change, the software giant notes: “Let us know what you think and if you are not seeing the battery life on your PC you are expecting, let us know via Feedback Hub.”

As we mentioned before, the Canary channel is the earliest testing avenue, and therefore the riskiest bet – this is the port of call for testers who want to be on the cutting-edge, where the dangers are higher than with other builds.

In other words, this early work on implemented power-saving changes might go awry, and your battery life could end up diminished, rather than extended. At least until any kinks are ironed out, anyway – and we expect they will be, in time, if there are major wrinkles present.

Microsoft is pretty vague about this change, but with any luck, it’ll help Windows 11 laptops eke out more battery life – and surfacing the ability to tweak power modes, making this more visible to everyday users, won’t hurt either.

You might also like...

Microsoft’s Copilot+ PCs are set for booming sales if some fresh predictions from an analyst firm are correct – and these laptops could threaten Apple’s MacBooks in the future.

Obviously, these figures are just an estimation, involving a crystal ball as well as educated guesswork, and the fact that the boom in AI PC sales is already underway. In case you missed it, in Q2 of 2024, AI PCs – defined as any computer with an NPU (Neural Processing Unit to accelerate AI workloads), not a Copilot+ PC, which needs a more powerful NPU, we should clarify – hit sales of 8.8 million according to Canalys, another analyst outfit, doubling up on Q1.

As Wccftech reports, the new prediction from Omdia suggests Microsoft’s ARM-based Copilot+ PC sales will reach 800,000 units this year, and that will shoot up by over 500% to 5.2 million units in 2025. That’ll accelerate further to a total of 47.7 million units of these laptops in 2028, we’re told.

When considering all AI PCs, meaning ARM-based devices and Intel or AMD AI laptops, we’re looking at a rather staggering 34.2 million units shipped in 2025, which with the ARM-based machines on top, gives a total of 39.4 million units. By 2028, that total of ARM and Intel/AMD AI PCs will be 155.4 million units – if this educated guesswork pans out, of course.


An Acer Swift Go 14 keyboard showing the Copilot key

(Image credit: Future / James Holland)

Analysis: Smack-Book talk

The long and short of it is that Copilot+ PCs are expected to be very popular – to an eye-opening extent – going forward. Of course, after this year, most AI laptops of the Windows 11 variety are going to be Copilot+ PCs (as the majority of the chips with NPUs from Intel, AMD and Qualcomm will qualify for that designation, having a suitably powerful NPU).

Omdia gives us some reasons why we might see such an explosion in popularity, namely that AI will help people be creative, as AI can take on image or video creation tasks, giving anyone the ability to be a content creator. Whether that’s a good thing, or not, regarding a flood of AI-generated content and all the various worries therein, very much remains to be seen – but undeniably it should be a major selling point for Copilot+ PCs, we’d agree.

AI PCs are also expected to make a big impact in the field of education, in terms of helping not just students, but teachers in preparing materials for their pupils (all kinds of coursework media will be a snap to create, of course).

Omdia further points out that if Microsoft equips ARM-based Copilot+ PCs with a peppy discrete GPU, these devices could be a major problem for Apple’s MacBooks.

The analyst firm observes: “If Microsoft introduces an AI gaming or AI creator laptop with a 45-80 watt thermal design power (ARM) chip with a discrete graphics card (Discrete-GPU), and compresses the thickness of the laptop to close to the institutional thickness of Apple’s MacBook Pro (within 16 mm) through the thin and light function of OLED displays, it will cause a crisis in Apple’s MacBook Pro sales.”

AI on the rise

Microsoft going this route wouldn’t be a surprise. In fact, it was a stated goal when Microsoft first launched Copilot+ PCs, when the company told us: “We will bring new Copilot+ PC experiences at a later date. In the future we expect to see devices with this silicon [meaning Qualcomm Snapdragon ARM-based chips, plus Intel and AMD CPUs] paired with powerful graphics cards like Nvidia GeForce RTX and AMD Radeon, bringing Copilot+ PC experiences to reach even broader audiences like advanced gamers and creators.”

Well, fair enough – Microsoft is doubtless planning more powerhouse ARM-based Copilot+ PCs (and x86 models, meaning Intel and AMD silicon) down the line, and they will surely be a challenge to the MacBook Pro. However, Apple is not going to stand still with the MacBook Pro either, and in a few years’ time, we’ll have even thinner (OLED-toting) models of the Pro too – maybe with their own equally highly performant graphics solutions (we certainly wouldn’t bet against it).

This isn’t just about the hardware, though, and a lot depends on exactly how well Microsoft does with pushing the software side of the equation, and getting Windows on ARM working seamlessly with emulation – given that most apps aren’t natively coded for ARM (but x86 instead). Microsoft’s Prism emulation layer is the key to achieving this – and the firm will need to progress with software compatibility, and smooth running, as we’re not quite there yet with Prism.

It's still very early days for Prism, and Copilot+ PCs in general, though – and attention-grabbing predictions like Omdia’s are kind of par for the course. However, major growth in AI PCs isn’t something that can be ruled out, and indeed it feels like a distinct possibility – but a lot of that may also be wrapped up in what AI features Microsoft can grace Copilot+ PCs with. On that front, things aren’t off to a great start with the Recall debacle, of course, and lately, everything has gone very quiet with that particular feature – perhaps ominously so.

You might also like...